W3CRM
W3CRM - Flask Admin Dashboard Template
This documentation is released on 09 April 2024
Thank you for purchasing this Flask template.
Flask - On Your Local Machine -
This page contains all the necessary information for setting up your project. Here, you'll find a detailed list of prerequisites required before you commence your project work. Ensure that you follow each step diligently to avoid overlooking any crucial aspects
For Windows
Install Python
Flask is a Python web framework, it necessitates the installation of Python on your system. Python
After completing the installation, open the command prompt and verify the installed Python version by running this command.
python --version
Install PIP
To install pip first we need to download get-pip.py file. To do that go to this link https://bootstrap.pypa.io/get-pip.py and save this file by ctrl + s in the same file where the python is located.
python get-pip.py
Now pip is installed in your system, you can check it through this command
pip --version
Install Flask
Now we have everything we need to install flask. We can easily install flask by running this command in the command prompt.
pip install flask
We are done with setting up flask in our system, now you can code all you want in flask.
For Linux
Update System
Update your system by executing the below given command in your terminal.
sudo apt-get update
Install Python
Although you already have python installed in your system, as it is included while installing any linux based os, but if it is not included run the following command to install python.
sudo apt-get install python3
Check the version
python3 -v
Install PIP
Pip is included with the python versions above 3.4. So if you have installed python version which is above 3.4 then you can skip this step
Run this command in the terminal to install pip
sudo apt-get install python3-pip
Install Flask
Now we are all set to install flask in our system. Run this command in the terminal:
pip install flask
Setup W3CRM
Make sure to have all above prerequisites installed & running on your computer. After you finished with the above steps, you can run the following commands into the terminal / command prompt from the root directory of the project to run the project locally or build for production use:
-
Command Description
-
python -m venv environment_nameCreate Virtual Environment on linux & mac OS
-
python -m venv environment_nameCreate Virtual Environment on Windows OS
-
source environment_name/bin/activateActivate Environment on Linux & mac OS
-
environment_name/Scripts/activateActivate Environment on Windows OS
Run below commands for install the libraries
Although you already have python installed in your system, as it is included while installing any linux based os, but if it is not included run the following command to install python.
pip install -r requirements.txt
Run The Flask Project
flask --app main.py --debug run
open the link http://127.0.0.1:5000 in your browser to view the project.
Run The Flask Project across the network
flask --app main run --host=0.0.0.0
Sass Compile -
1.- Install Node.js
To compile Sass via the command line first, we need to install node.js. The easiest way is downloading it from the official website nodejs.org open the package and follow the wizard.
2.- Initialize NPM
NPM is the Node Package Manager for JavaScript. NPM makes it easy to install and uninstall third party packages. To initialize a Sass project with NPM, open your terminal and CD (change directory) to your project folder.
npm init

Once in the correct folder, run the command npm init. You will be prompted to answer several questions about the project, after which NPM will generate a package.json file in your folder.
3.- Install Node-Sass
Node-sass is an NPM package that compiles Sass to CSS (which it does very quickly too). To install node-sass run the following command in your terminal: npm install node-sass
npm install node-sass
4.- Write Node-sass Command
Everything is ready to write a small script in order to compile Sass. Open the package.json file in a code editor. You will see something like this: In the scripts section add an scss command
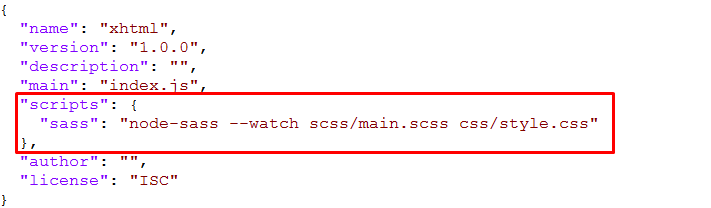
"scripts": {
  "sass": "node-sass --watch scss/main.scss css/style.css"
},
5.- Run the Script
To execute our one-line script, we need to run the following command in the terminal: npm run sass
npm run sass
6.- Other Option
--source-map
"sass": "node-sass --watch scss/main.scss css/style.css --source-map css/style.css.map"
Folder Directories -
- package
- w3crm
- __pycache__
- static
- templates
- __init__.py
- routes.py
- main.py
- requirements.txt
- w3crm
Theme Features -
static/w3crm/js/deznav-init.js
dzSettingsOptions = {
	typography: "poppins",
	version: "light",
	layout: "vertical",
	primary: "color_1",
	headerBg: "color_4",
	navheaderBg: "color_4",
	sidebarBg: "color_1",
	sidebarStyle: "full",
	sidebarPosition: "fixed",
	headerPosition: "fixed",
	containerLayout: "full",
};

Color Theme -
So many color option available
var dezSettingsOptions = {
	typography: "poppins",  		More Options => ["poppins" , "roboto" , "Open Sans" , "Helventivca" ]
	version: "light",       		More Options => ["light" , "dark"]
	layout: "horizontal",   		More Options => ["horizontal" , "vertical"]
	primary: "color_11",			More Options => ["color_1," , "color_2," ..... "color_15"]
	headerBg: "color_1",			More Options => ["color_1," , "color_2," ..... "color_15"]
	navheaderBg: "color_1",			More Options => ["color_1," , "color_2," ..... "color_15"]
	sidebarBg: "color_11",			More Options => ["color_1," , "color_2," ..... "color_15"]
	sidebarStyle: "compact",		More Options => ["full" , "mini" , "compact" , "modern" , "overlay" , "icon-hover"]
	sidebarPosition: "static",		More Options => ["static" , "fixed"]
	headerPosition: "fixed",		More Options => ["static" , "fixed"]
	containerLayout: "full",		More Options => ["full"]
	direction: direction			More Options => ["ltr"]
};
Credits -
-
amcharts
-
animate
-
apexchart
-
bootstrap
-
bootstrap4-notify
-
bootstrap-daterangepicker
-
bootstrap-material-datetimepicker
-
bootstrap-multiselect
-
bootstrap-select
-
bootstrap-tagsinput
-
bootstrap-touchspin
-
chart.js
-
chartist-plugin-tooltips
-
clockpicker
-
datatables
-
dropzone
-
fullcalendar
-
highlightjs
-
jquery
-
jquery-asColor
-
jquery-asColorPicker
-
jquery-asGradient
-
jquery-sparkline
-
jquery-steps
-
jqueryui
-
jquery-validation
-
metismenu
-
moment
-
nestable2
-
nouislider
-
perfect-scrollbar
-
pickadate
-
select2
-
summernote
-
svganimation
-
sweetalert2
Our Products -


Do You Need Help To Customization
After Purchase A Template...
You Will Start Customizing According Your Requirement
BUT What If You Don't Know
SOLUTION IS HIRE DexignZone
Hire Same Team For Quality Customization
- In Order To Ensure Your Website Is Live, We Will Customize
The Template According To Your Requirements And Upload It to the Server.